• HOME
  • SERVICES
    • Staging Portfolio
    • Interior Design
  • Blog
  • Contact
Menu

Staged by ana egger

Home Edits // Remodel Design // Staging
  • HOME
  • SERVICES
  • PORTFOLIO
    • Staging Portfolio
    • Interior Design
  • Blog
  • Contact

DIY Light Sconce without Wiring!

January 5, 2022

I really wanted to add some cute sconces on either side of the bed but didn’t want to pay for wiring/electric work! So I’m sharing my solution!!

Step 1: Gather Materials

Linking them all here:

-Sconce (wanted something small yet stylish and affordable)

-Hot Glue Gun

-Puck Lights

-Socket Adaptor

STEP 2: Tape Back Wires

Use electrical tape to hide wires since you won’t be sticking them into the wall!

STEP 3: Mount to wall

Next mount the metal piece to the wall - make sure it’s level!

STEP 4: Hot glue adaptor and puck light

Make sure hot glue is on the “plug in” side of the adaptor leaving screw in part exposed!

Step 5: Screw into sconce

STEP 6: Enjoy!

The puck lights I linked came with a remote so you just need to point and turn on!

Tags DIY, Lighting, DIY Sconce, NO wired sconce
DIY Barn Door | @DIYdontya.com

DIY Barn Door

July 30, 2020

I’m so excited to share my barn door tutorial!!!! Full disclosure we had a pretty hard time hanging it up! Sooooooo, this tutorial will focus mostly on building the barn door rather than installing it. You can watch this video for more of an install tutorial.

MATERIALS

  • (1) 4x8 23/32 sanded plywood

  • (2) 6ft 1x6 boards

  • (2) 8ft 1x4 boards

  • (4) 8 ft 1x2 boards

  • Liquid Nails

  • Small Clamps (I used like 10)

  • Large Clamps

  • Miter saw

  • Nail Gun

  • Sand Paper

  • Behr Ultra white Paint & Primer (see step )

  • Laser Level (for mounting)

  • Barn Door Mounting Set

  • Barn Door Handle

STEP 1

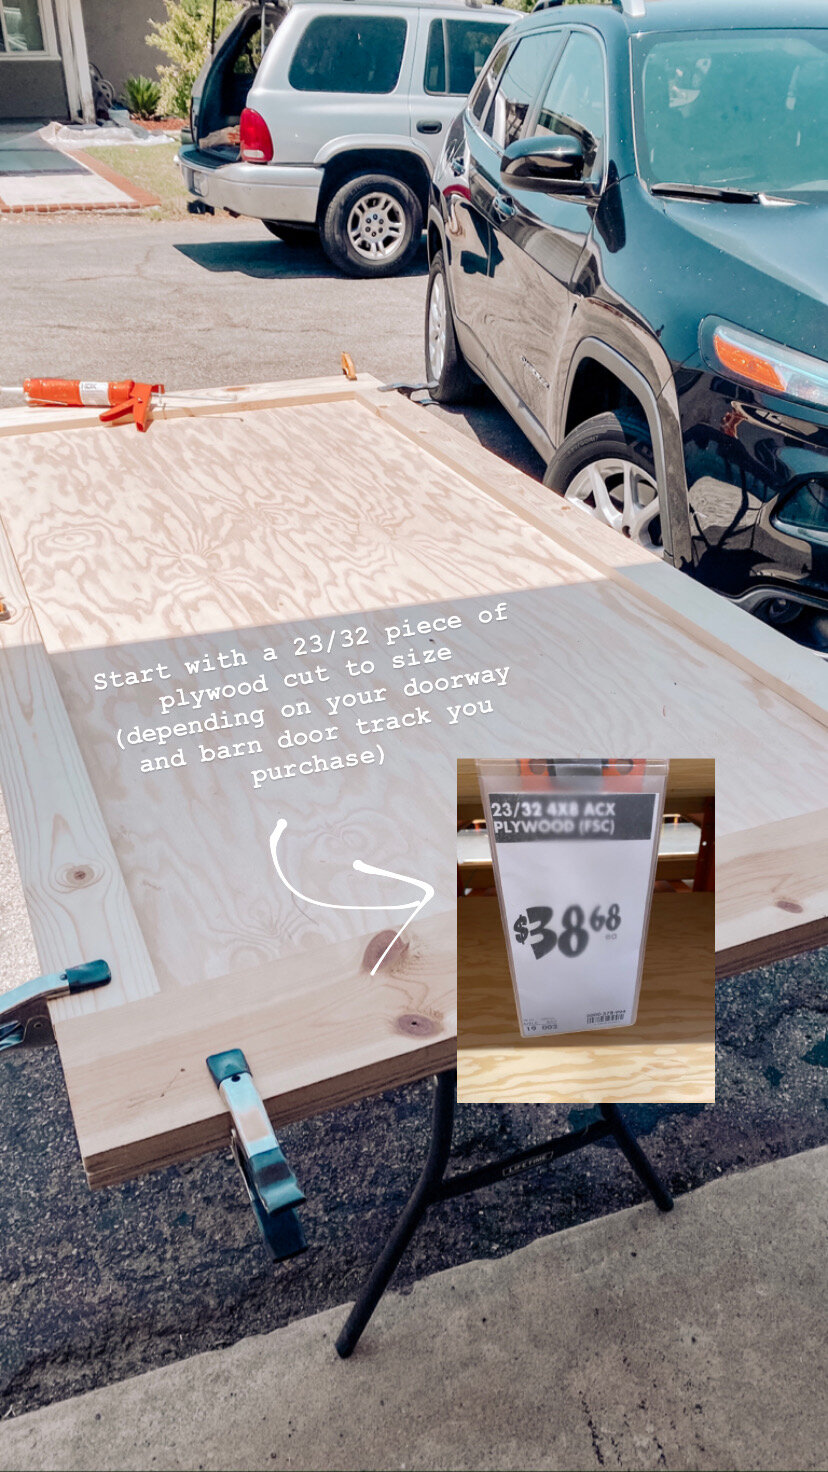
Purchase all the materials listed above! Start with your plywood and cut to size. Size will depend on your specific ceiling height and doorway. It is super helpful to read the instructions for the barn door track to determine sizing (it has to be a certain height from the floor etc.)

DIY Barn Door Tutorial: Step 1

STEP 2

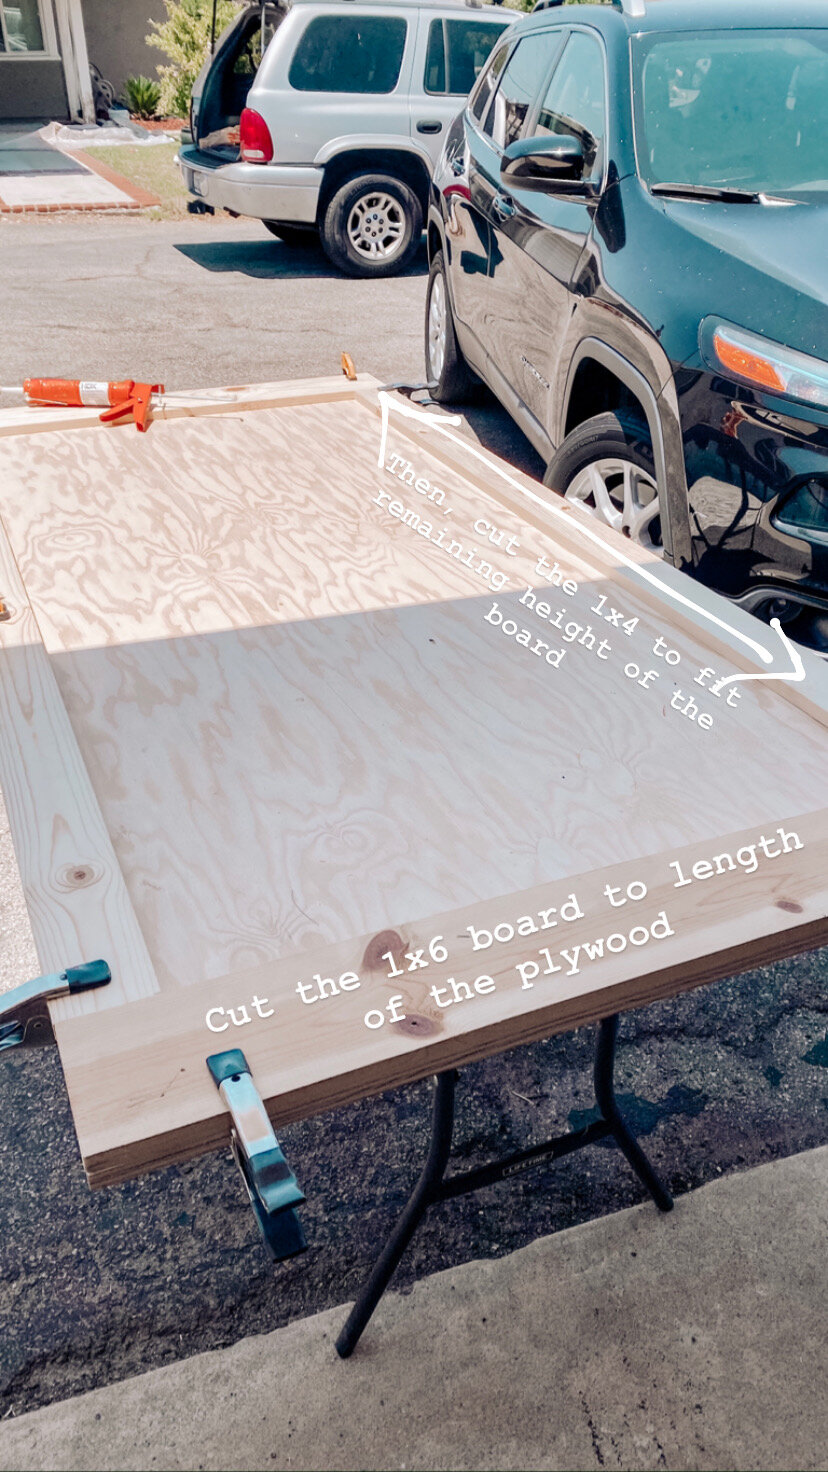
Cut the 1x6 board to match the width of the plywood. For example: If your door is 40 inches wide - cut the 1x6 board 40 inches. Then, cut the 1x4 board to fit remaining height. This will most likely be height of the plywood minus 11 inches. Glue with liquid nails and clamp!

DIY Barn Door: Step 2

STEP 3

Now onto the diagonal wood detailing in the middle of the board! This was the trickiest part for me to figure out! Start at the top left corner. cut the end of a 1x2 at a 45 degree angle using the miter saw. Stick it in the top left corner. Make sure it is nice and snug!

DIY Barn Door: Step 3

STEP 4

Mark a line on the other end of the 1x2 to match the side board using some kind of straight edge. Then use the miter saw to cut along the marked line. Glue & clamp!

DIY Barn Door: Step 4 | @DIYdontya

STEP 5

Now repeat that process in the bottom right corner!

DIY Barn Door: Step 5

STEP 6

For the smaller diagonal pieces in the top right corner, measure the center width of the top of the board and mark! Cut the end of a 1x2 board at a 45 degree angle using the miter saw. Match up the center of the 1x2 end with the mark made earlier. Repeat process used earlier to trim the other end of the board (Mark a line on the other end of the 1x2 to match the side board using some kind of straight edge. Then use the miter saw to cut along the marked line. ) Glue & clamp!

DIY Barn Door: Step 6 | @DIYdontya

STEP 7

Repeat this process in the bottom left corner

DIY Barn Door: Step 7 | @DIY Dontya

STEP 8

At this point you should have 4 diagonal pieces. For the center diagonal piece - measure the center of the height of the board and mark. Cut the end of a 1x2 board at a 45 degree angle using the miter saw. Match up the center of the 1x2 end with the mark made earlier. Repeat process used earlier to trim the other end of the board (Mark a line on the other end of the 1x2 to match the side board using some kind of straight edge. Then use the miter saw to cut along the marked line. ) Glue & clamp!

DIY Barn Door: Step 8 | @DIYdontya

STEP 9

Use a nail gun to nail down all your wood. Don’t get too crazy. Just a nail or 2 at each end!

DIY+Barn+Door%3A+Step+%40DIYdontya

STEP 10

Now sand the rough edges!

DIY Barn Door: Step 10 | @ DIYDontya

STEP 11

Using Interior flat BEHR paint and primer-in-one, paint your board! I used ultra white. I used a roller for the big areas and a brush for the smaller areas such as the sides of the 1x2s and corners. Lesson learned: don’t skip the wood putty!) In hind sight I would have used wood putty to smooth out nail holes and grooves in wood for a smoother finish.

DIY Barn Door: Step 11 | @ DIYdontya

STEP 12

Pour yourself a drink! You are almost done!! In about 2 coats my board was looking freshhhhh.

DIY Barn Door: Step 12 | @ DIYdontya

STEP 13

Now onto the install…watch this video tutorial and good luck!

In DIY DECOR, DIY PROJECTS, STYLING Tags DIY, Barn Door, Barn Door Tutorial
Comment
Patterned tile wall

Patterns

March 3, 2019

I’ve been so inspired by Patterns lately. Tile with patterns, clothes with patterns, patterned towels and rugs. A simple neutral pattern can add a lot to a look with out being too overwhelming. So I thought I would put a fun little post together to show off the patterns in the guest bath!

PATTERNED TILE

Patterns EVERYWHERE - neutral patterns on my shirt, hat, towels and now wall!

Patterns EVERYWHERE - neutral patterns on my shirt, hat, towels and now wall!

This patterned wall adds so much to the guest bath! I am so glad I went with this classic twenties pattern. See how I did it ALL myself HERE.

See the full details of my guest bath renovation HERE.

PATTERNED TOWELS

Have to tell my husband everyday - these towels are not to dry off with!!!!

Have to tell my husband everyday - these towels are not to dry off with!!!!

These patterned towels add the perfect texture to the coastal farmhouse look. I love how simple, yet unique they are. Grab some HERE.

In DIY DECOR Tags DIY, Patterned tile
Comment
This year we decided to do Galentines a little differently… PJ party, popcorn, rose, sweat treats, and the ultimate chick flick.

This year we decided to do Galentines a little differently… PJ party, popcorn, rose, sweat treats, and the ultimate chick flick.

3 STEPS TO THE PERFECT GALENTINE'S

February 6, 2019

This year we decided to do galentines a little differently… old school PAJAMA PARTY. Remember you were 12 and there was nothing better than a sleepover with your best friends? That feeling was the inspo for this Galentines! We dedided on rose, sweat treats, popcorn and… get ready… “To All the Boys I’ve Loved”. We are wearing matching PJs, with no shame! So call up your BFFs, spread the love, celebrate girl power, and let’s do this!

Here are the steps to hosting the perfect Galentines!

STEP 1: Trader Joes Run!

Here’s the shopping List:

Head to your local trader Joes for all your Galentine essentials!

Head to your local trader Joes for all your Galentine essentials!

2 dozen Pink/white Roses (6.99 each)

Chocolate Cupcakes (3.99)

Kettle Corn Popcorn (2.49)

Mini Dark Chocolate Hearts (2.99)

Spindrift Grapefruit (3.99)

XOXO Gummies (2.99)

Moonlight and Roses Coteaux (8.99)

STEP 2: Make Garland

Tie strings around the ends of trimmed roses and you are DONE!

Tie strings around the ends of trimmed roses and you are DONE!

STEP 3: Post on Insta

So ready for Galentine’s this year!

So ready for Galentine’s this year!

Ready for my girls!

Ready for my girls!

ENJOY! May all your Galentine’s dreams come true!

Tags DIY, GALENTINES
Comment
THESE FREE GIFT TAGS ADD SO MUCH TO MY HOLIDAY WRAPPING!

THESE FREE GIFT TAGS ADD SO MUCH TO MY HOLIDAY WRAPPING!

CHRISTMAS GIFT TAGS: FREE DOWNLOAD!

December 16, 2018

Wrapping is one of my favorite things this time of year. I love thinking of a new theme for under the tree. One thing I always struggle with is finding cute/affordable tags to go with the ribbons and wrapping. So this year, I teamed up with my twin sis Tatiana Soash to create these FREE downloadable tags! All you need is some cardstock, scissors, and a printer. Click below to download. Happy Wrapping!

CLICK HERE TO DOWNLOAD SET 1
CLICK HERE TO DOWNLOAD SET 2
LOVE THESE GIFT TAGS DESIGNED BY @TATIANASOASH

LOVE THESE GIFT TAGS DESIGNED BY @TATIANASOASH

CAN’T WAIT TO USE THESE GIFT TAGS FOR ALL MY PRESENTS THIS YEAR!

CAN’T WAIT TO USE THESE GIFT TAGS FOR ALL MY PRESENTS THIS YEAR!

These gift tags are gonna look so trendy under my tree!

These gift tags are gonna look so trendy under my tree!

In DIY PROJECTS Tags DIY, Wrapping, gift, holiday, christmas tag, holiday gift tag, gift tag download
Comment

Latest Posts

Featured
Touches of BLUE
BARELA KITCHEN REMODEL DETAILS
Manhattan Dining Room Project
ENTRY WAY REVAMP
DIY Light Sconce without Wiring!
Manhattan Guest Bathroom Remodel Details
Christmas Jar DIY
Baby Nova's Nursery Details
DIY Bathroom Shelving
Boho Entryway Inspo